MON - FRI: 9:00 to 7:00 EST
Strengthening Email Security: Adding DMARC and DKIM Records to Your DNS with Google Workspace
In today’s digital landscape, email remains a crucial communication channel for businesses. However, with the rise of email-based threats such as phishing and spoofing, it has become essential to implement robust security measures. Two such measures are DMARC (Domain-based Message Authentication, Reporting, and Conformance) and DKIM (DomainKeys Identified Mail), which help enhance email security and prevent unauthorized use of your domain name. In this article, we will guide you through the process of adding DMARC and DKIM records to your DNS settings using your Google Workspace admin account.
Video Tutorial
Why DMARC and DKIM are Important
DMARC and DKIM work together to authenticate and validate the origin of emails, ensuring their integrity and preventing domain spoofing. Here’s why they are important:
- DMARC: DMARC is an email authentication protocol that allows domain owners to specify how email servers should handle messages from their domain. It provides visibility into email sources and prevents unauthorized senders from using your domain for malicious purposes. By implementing DMARC, you can protect your brand reputation, increase email deliverability, and reduce the risk of phishing attacks.
- DKIM: DKIM is a digital signature added to the header of outgoing emails. It enables the recipient’s email server to verify that the message was sent by an authorized sender and hasn’t been tampered with during transit. By adding a DKIM signature to your emails, you can increase their trustworthiness and prevent them from being marked as spam.
Adding DKIM Records to Your DNS Settings
- Log in to your Google Workspace admin console via admin.google.com.
- On the left-side panel, click on “Apps,” then select “Google Workspace,” followed by “Gmail.”
- Scroll down to the “Authenticate email” section and click on it.
- Under the DKIM authentication section, click on “Generate New Record.”
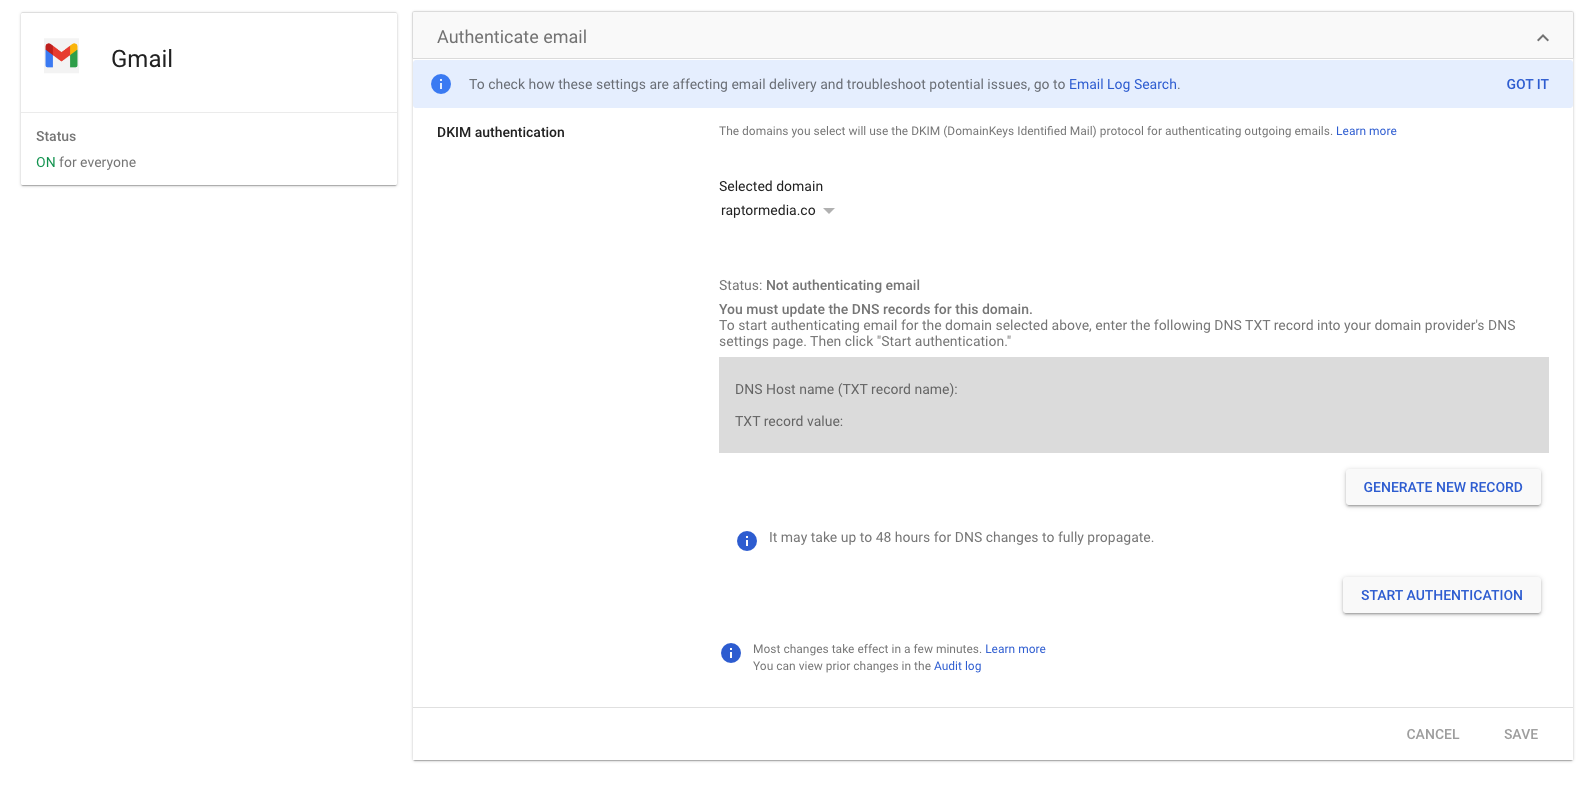
- A DKIM record will be generated. Copy the generated record, as you will need it to add to your DNS settings.
- Visit your domain host’s website (e.g., GoDaddy) and access the DNS settings for your domain.
- Locate the DNS TXT record section or the option to manage DNS records for your domain.
- Create a new TXT record.
- In the TXT record’s Name or Host field, enter the DKIM selector you copied from the Google Workspace admin console.
- In the TXT record’s Value field, paste the DKIM record you copied from the Google Workspace admin console.
- Use default option for TTL.
- Save the changes to update your domain’s DNS settings.
- It may take up to 48 hours for DNS changes to fully propagate.
Adding DMARC Records to Your DNS Settings
- Visit your domain host’s website (e.g., GoDaddy) and access the DNS settings for your domain.
- Locate the DNS TXT record section or the option to manage DNS records for your domain.
- Create a new TXT record.
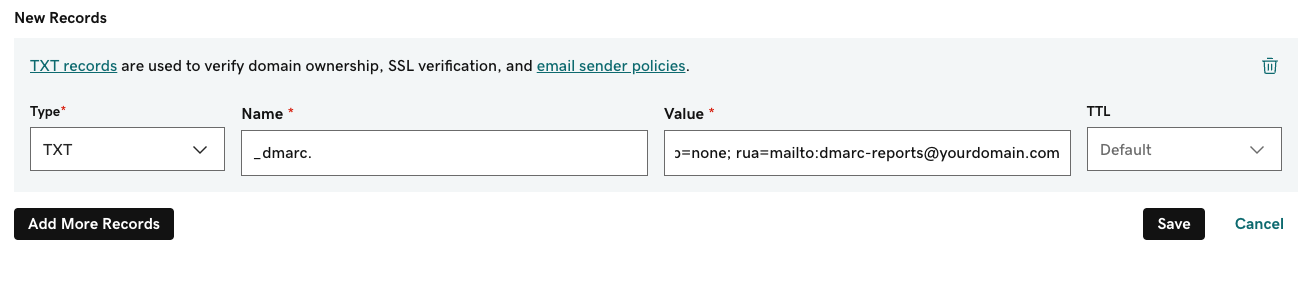
- In the TXT record’s Name or Host field, enter “_dmarc”.
- Add a DNS TXT record or modify an existing record with the following details:
- TXT record name: In the DNS Host name field, enter: _dmarc.
- TXT record value: In the second field, enter the text for your DMARC record, for example: v=DMARC1; p=none; rua=mailto:dmarc-reports@yourdomain.com
- Important: The field names might be different for your provider. DNS TXT record field names can vary slightly from provider to provider. The domain used here is an example domain. Replace yourdomain.com with your own domain!
- Use default option for TTL.
- Save the changes to update your domain’s DNS.
Refer to this Google article for more details about DMARC.
By implementing DMARC and DKIM records in your DNS settings, you enhance the security and credibility of your email communications. These measures help protect your domain from unauthorized use, minimize the risk of phishing attacks, and improve email deliverability. We encourage you to follow the steps outlined in this article to add DMARC and DKIM records using your Google Workspace admin account.
If you encounter any difficulties or require further assistance in optimizing your Google Workspace email configuration, consider reaching out to Webmaster’s Desktop. Our experts can guide you through the process and provide valuable insights to enhance your email deliverability and security. Stay vigilant and safeguard your organization’s email communications.